
Authenticating Jitsi Meetings using Keycloak

I am a Software Engineer, with a passion for building cool stuff. I love to learn new languages in my spare time. I also make music as a hobby.
Authentication is an important aspect of the software. Jitsi, which is an open-source video conferencing platform, allows us to authenticate using different methods. This article assumes that you have a basic understanding of jwt tokens, Keycloak and Jitsi. The goal of this article is to show how to secure your Jitsi service using Keycloak.
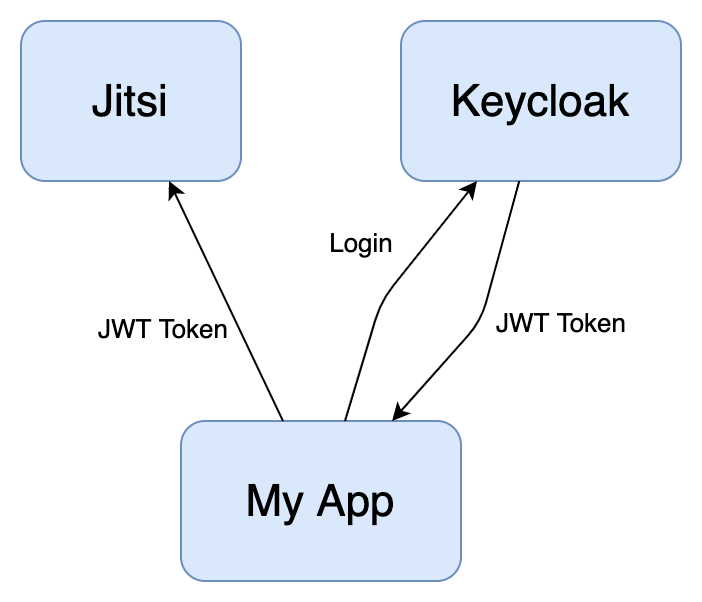
The figure below gives an overview of how the process works, the app first authenticates itself with Keycloak to retrieve the Jwt token after which it can use it to access Jitsi.
Private Key-Public Key JWT Tokens
JWT Tokens can use two methods to prove their authenticity. First is by using a shared secret that is known by the systems that need to verify the tokens. This is an easier approach but it is a bit tedious since we have to keep the secret synched with the applications. The other approach for verifying jwt tokens is using private and public keys which Keycloak also supports. For this keycloak signs the jwt using its private key, this is done by taking the jwt header and jwt payload and signing it with the private key as shown in the diagram below.
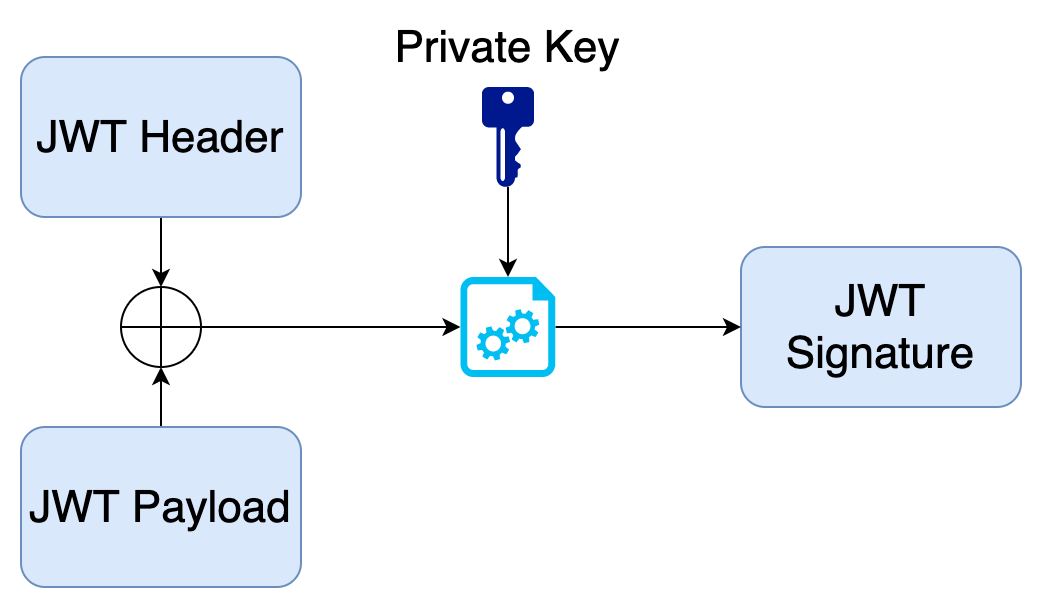
To verify the authenticity of a jwt token we take the public key, the received jwt header and jwt payload and verify it with the signature of the jwt.

Keycloak Configuration
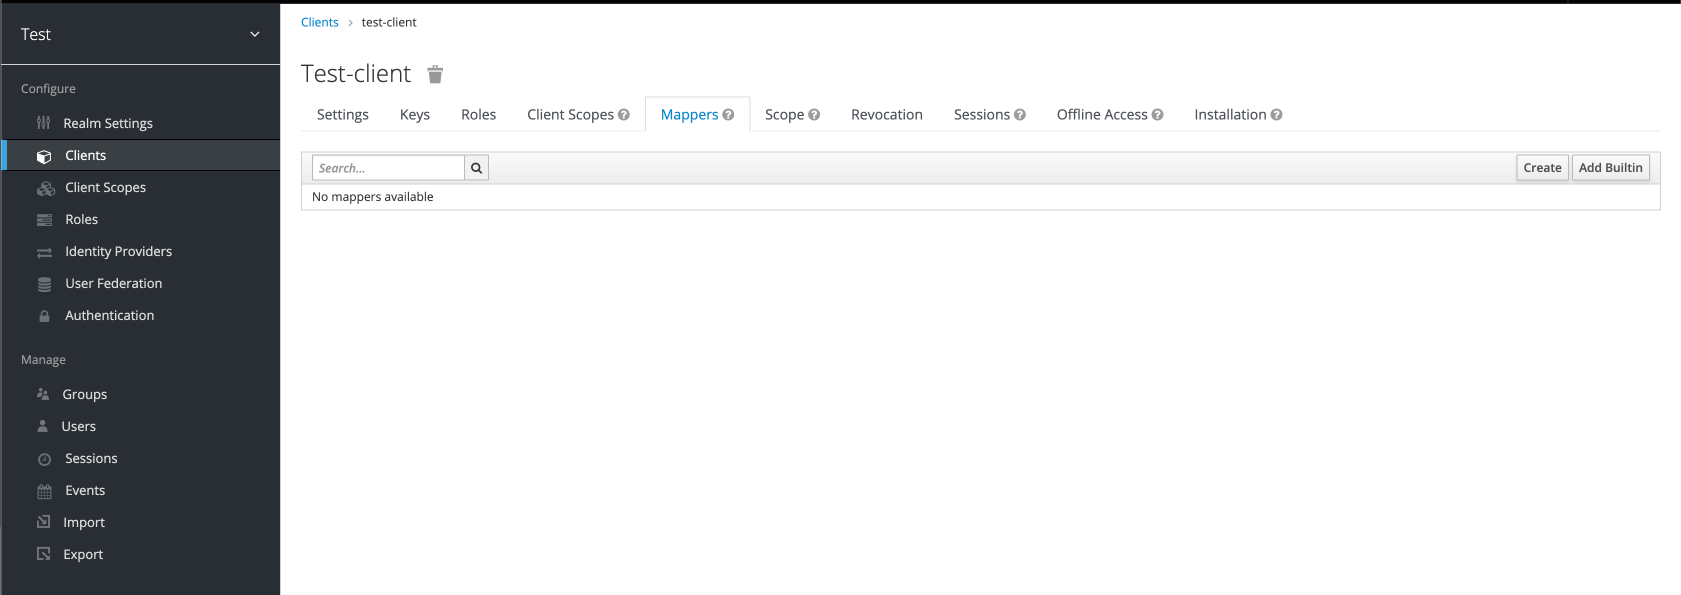
Navigate to the client that you are using for the app, in the Keycloak admin panel. Head over to the “Mappers” tab which shows the different custom or built-in claims that have been set up. You can click on the “Create” button on the top right to create custom mappers which we need to do.
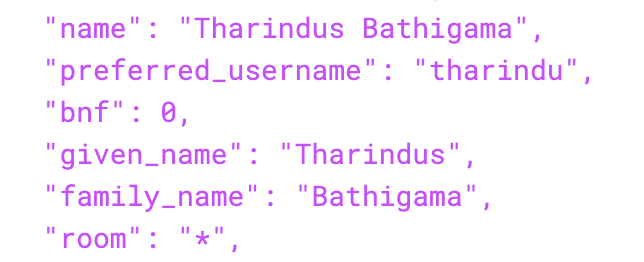
Jitsi needs two claims inside of the jwt, which are “room” and “bnf”. The “room” claim is to check whether the user has access to a certain room. The “bnf” claim can be set to a constant 0 (zero).
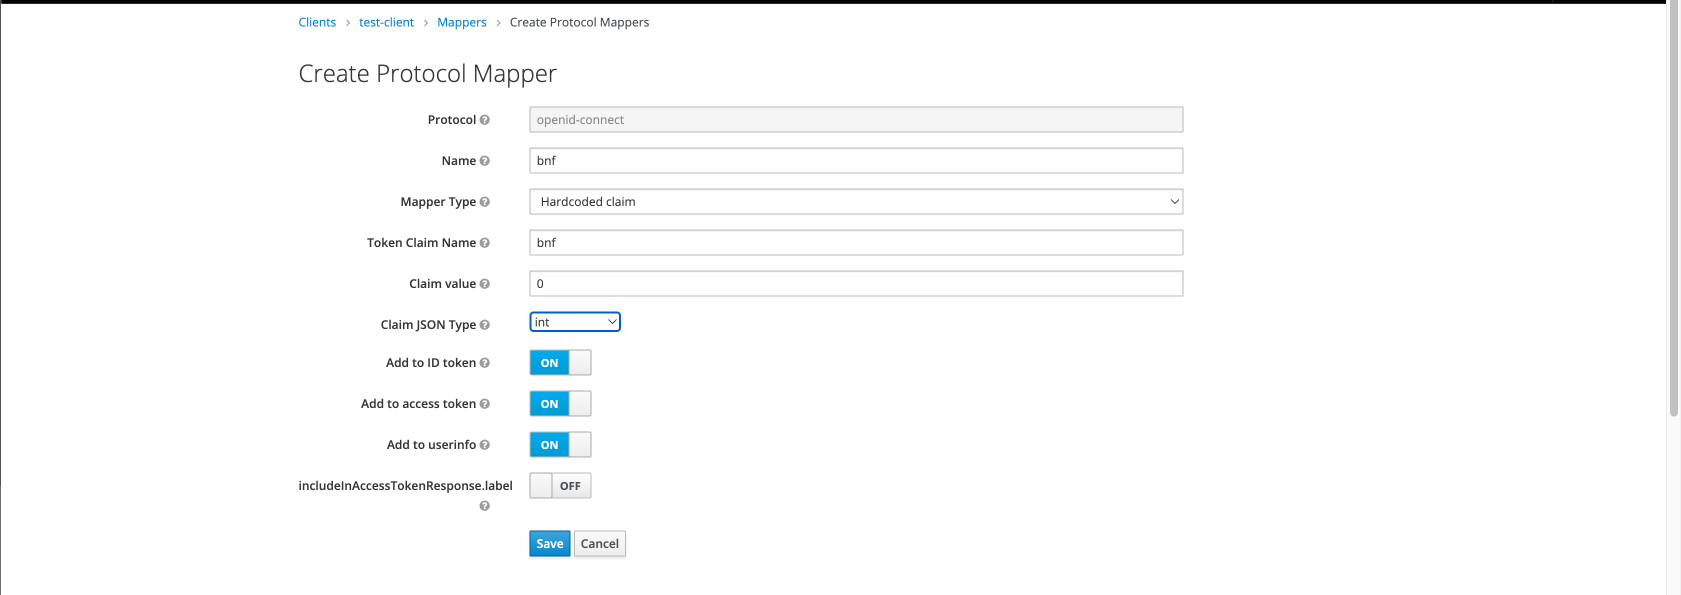
For the “room” claim you can either take it from the user properties where it can be controlled using the admin apis available for you. But, for this example I’ll be using a hardcoded value “*” which tells Jitsi that the token has access to every room.
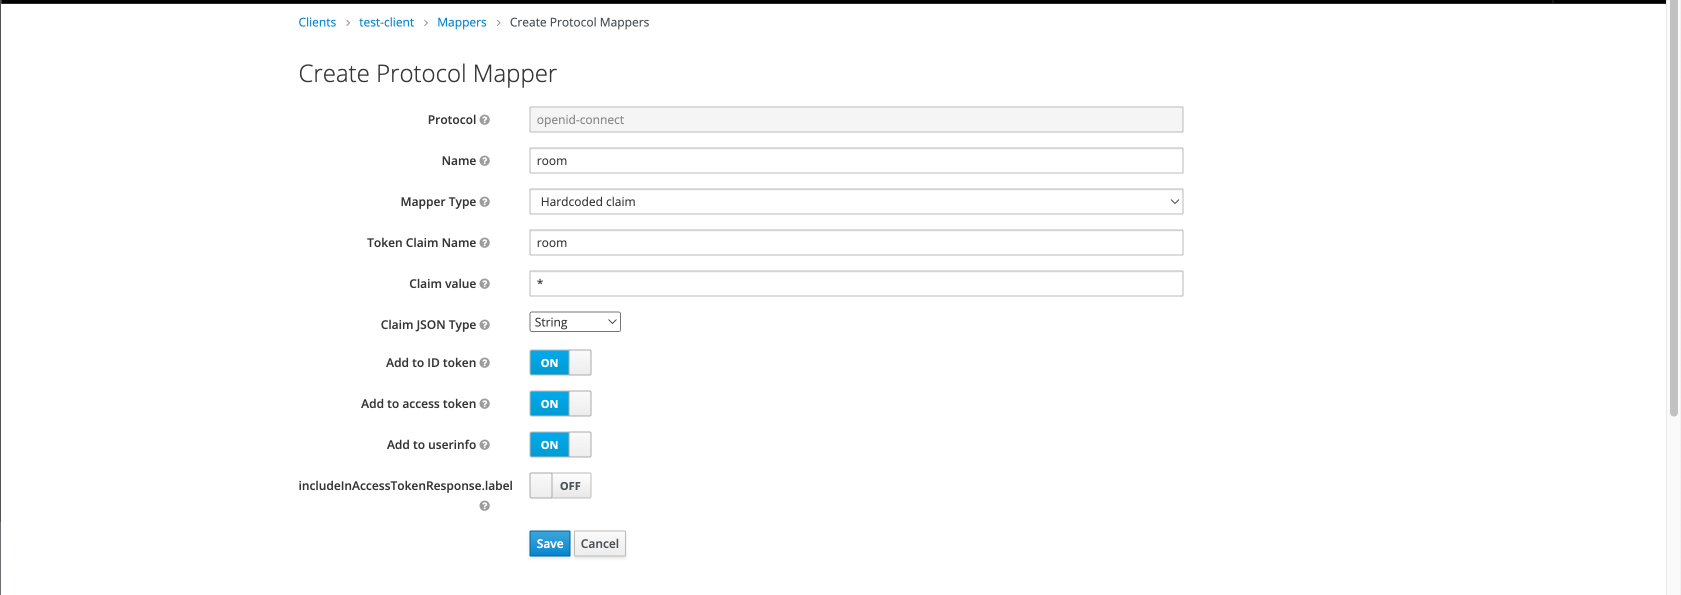
After creating these mappers, your client should have its mappers section populated with the two created mappers. If you check the jwt token provided to your application using a tool like https://jwt.io/ you can verify that the claims are actually there.
Jitsi Configuration
In Jitsi, we need to change the .env file and put the following configs into it.
# Enable authentication
ENABLE_AUTH=1

# Enable guest access
ENABLE_GUESTS=0

# Select authentication type: internal, jwt or ldap
AUTH_TYPE=jwt

# JWT authentication
#

# Application identifier
JWT_APP_ID=jitsi

JWT_ASAP_KEYSERVER=http://localhost:9000/certs

# (Optional) Set asap_accepted_issuers as a comma separated list
JWT_ACCEPTED_ISSUERS=http://localhost:8080/auth/realms/test

# (Optional) Set asap_accepted_audiences as a comma separated list
# JWT_ACCEPTED_AUDIENCES=my_server1,my_server2

JWT_AUTH_TYPE=token
JWT_TOKEN_AUTH_MODULE=token_verification
JWT_ACCEPTED_ISSUERS is a field where you can specify the iss or issuers of the jwt token, so that only tokens with the ones specified in the configuration are permitted to access the rooms. Likewise, we can use JWT_ACCEPTED_AUDIENCES to control it using the aud property of the jwt.
The JWT_ASAP_KEYSERVER is the property which tells jitsi from where to get the public key so as to verify the jwt token. For this you have to create a service that retrieves the public key in a .pem file format.
Key Server
The Jitsi server requests the public key by using the kid property in the jwt header.
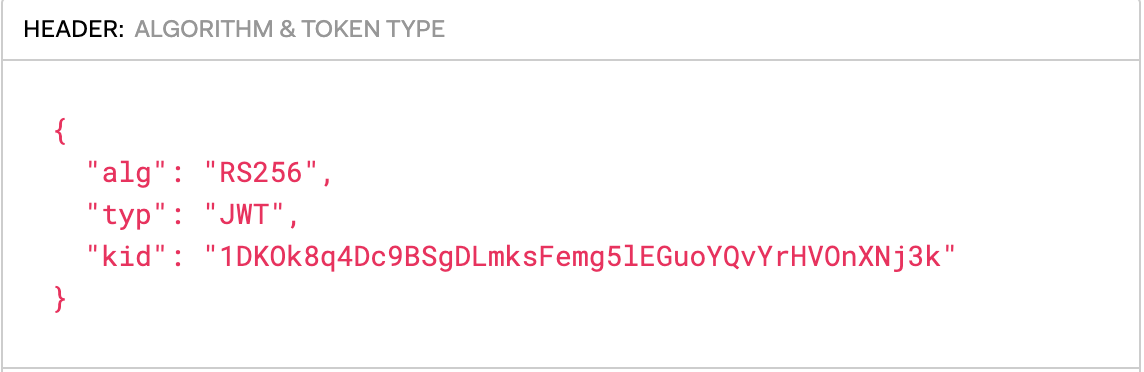
The kid of a jwt will remain same as long as the it uses the same private public key pair for signing the token. The Jitsi server takes the sha256 hash of the kid property and requests the key server in this case which is [http://localhost:9000/certs](http://localhost:9000/certs).
In this case sha256("1DKOk8q4Dc9BSgDLmksFemg5lEGuoYQvYrHVOnXNj3k") is "e15452c2c03fc8afdb1d558953ab30ffd235a622fad1175de7f791a3c86eb08d".
Therefore, the Jitsi server requests the public key by sending a GET request to http://localhost:9000/certs/e15452c2c03fc8afdb1d558953ab30ffd235a622fad1175de7f791a3c86eb08d.pem.
So the goal of our custom key server will be to take this request and produce the relavent public key.
Keycloak Public Key Retrieval
So, how do you get the public key for a specific kid value in keycloak? To do that we first need to head over to the keycloak admin panel and in the “General” tab of the realm, click on “OpenID Endpoint Configuration” in the “Endpoints” section.

You are then presented with a JSON of the configuration of endpoints for that realm. From there take the jwks_uri and head over to that url, it might look something like https://localhost:8080/auth/realms/test/protocol/openid-connect/certs. This also provides a JSON which has a keys array that lists all the public keys used by that realm, and as you can see the key with kid that we were looking for 1DKOk8q4Dc9BSgDLmksFemg5lEGuoYQvYrHVOnXNj3k is also there.

For each of the key n - modulus e - exponent are listed in the JSON response from keycloak. We need to take these two and produce the public key. Below code section gives an example of how you can produce the public key in Java, you could google around and find something equivalent that in your language.
package com.tharinduhasthika.certs;

import java.math.BigInteger;
import java.security.KeyFactory;
import java.security.PublicKey;
import java.security.spec.RSAPublicKeySpec;

class CertService {

    private String createPublicKey(String b64Modulus, String b64Exponent) throws Exception {
      BigInteger modulus = new BigInteger(1, new Base64URL(b64Modulus).decode());
      BigInteger exponent = new BigInteger(1, new Base64URL(b64Exponent).decode());
      RSAPublicKeySpec spec = new RSAPublicKeySpec(modulus, exponent);
      KeyFactory factory = KeyFactory.getInstance("RSA");
      PublicKey pub = factory.generatePublic(spec);
      return Base64.encodeBase64String(pub.getEncoded());
  }

    private String makeCertFile(String b64Modulus, String b64Exponent, String kidHash) {
    String publicKey = createPublicKey(b64Modulus, b64Exponent);
    String certBody = "-----BEGIN PUBLIC KEY-----\n" + publicKey + "\n" + "-----END PUBLIC KEY-----";
    return certBody;
  }

}
After generating the public key you have to set the content type of the response to Content-Type: application/x-x509-ca-cert; charset=utf-8 .
That’s all that needs to be done. Hope you got a basic idea of how to setup the integration. If there are any clarification that needs to be improved feel free to let me know. I have listed below some references that I have used to learn how to do it myself.
References


