
Git Essentials
I am a Software Engineer, with a passion for building cool stuff. I love to learn new languages in my spare time. I also make music as a hobby.
This is a beginner oriented article to understand how git works and the essential commands to use it. So let's start by asking the question, How do you share code or projects with your co-workers or fellow programmers?
It used to be if you needed to share code among a group that is working on the same software, a floppy is needed to copy the code from one computer to the other. After the internet was invented and email with that, programmers began to share code in email. As sending the whole project code was a waste of time and bandwidth, some decided to use a patch system which would only send the difference of the old version and the new version of the code. Following this idea some great tools were developed, like Mercurial, Apache Subversion. These softwares known as Version Control Systems were and are still used in the industry.
How does Git come in to this?
Git which is also a version control system that was originally created for the Linux Kernel, as the tools which were available at that time did not satisfy the needs of those developers. After it's creation it has been used and is still used by almost all of the software industry. So learning git will be a pro in your list of skill set if you are planning to work at any position in the software industry.
Getting Git
There are two flavors of the git tool.
- CLI (Command Line Interface)
- GUI (Graphical User Interface) only for windows and Mac
In this article I'll be going through the CLI tool of git. It can be installed from here. So if you would like to go through this guide by doing it yourself please install git in your system.
Git Configuration
You'll have to configure your name and email address before using git.
git config --global user.name [name]
git config --global user.email [email]
Git Initialize
To use git in your project first cd into your project folder
cd [project-folder]
Then type
git init
This will create a subfolder in your project folder named ".git" you don't need to worry about it, just don't delete it because it is how git manages your project.
Adding Files
The git project that you created is now essentially empty, git doesn't automatically adds files into the repository (project). You have to add the following to which are needed to be committed, to do that type
git add [file-name-list]
Or
git add -A
Aadds all the files in your project folder.
Git Commit
A commit is a specific instance in your project that you decided to put a hash value and store in a safe place. So if you need to come back to that specific point in time if there are some unexpected bugs you can do that. Now that you have an idea why they are important let's see how to create them.
Now that you have added the files using git add the files are in staging, you can even remove files that you don't need in the commit. Let's create a commit
git commit -m "an insightful message"
The -m flag is to add a message along side the commit so that the commit can identified easily.
Git Branches
The easiest way of thinking of git branches for me is to think of it as forming another parallel universe, basically you take the exact code and split into another space. You can change the code in one branch without affecting the other branches. It is very useful when every developer is given a small part of the project and he or she can just develop their part in their own branch.
The branch mechanism is useless without a way to merge the branches into a single branch after one branch had finished it's development. For that there is git merge I'll come to that later, I just wanted you to see the whole branch merge mechanism and how it can be used.
So to create a new branch
git branch [branch-name]
To switch between branches
git checkout [branch-name]
You can create and switch to a new branch with this one liner
git checkout -b [branch-name]
Usually the main branch is named main.
After switching to a branch you can follow the add commit cycle for your development.
Git Merge
As I told earlier the merge is used to merge two branches or more precisely merging one branch into the other. So if you wanted to merge from branch01 to main.
First make sure that branch01 is based off of the latest main commit. If not it will give an error, to prevent that you need to rebase to that commit if you are not based on that. It will create a merge conflict if there was a change done to the code at the same places that you have changed, so you'll have to resolve them yourself. I'll explain them later, so for now think that didn't happen.
To rebase to the latest main do the following
git checkout branch01
git rebase main
Then switch to the main branch
git checkout main
Then merge the branch01
git merge branch01
Git Merge Conflicts
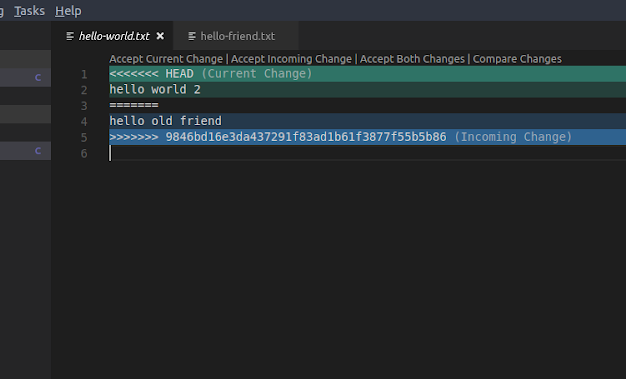
In the case where there were changes in the same places that you changed and was happened after you started working on that part, conflicts will be generated by git and I'll be your job to resolve them. There are some tools used for the to open them type
git mergetool
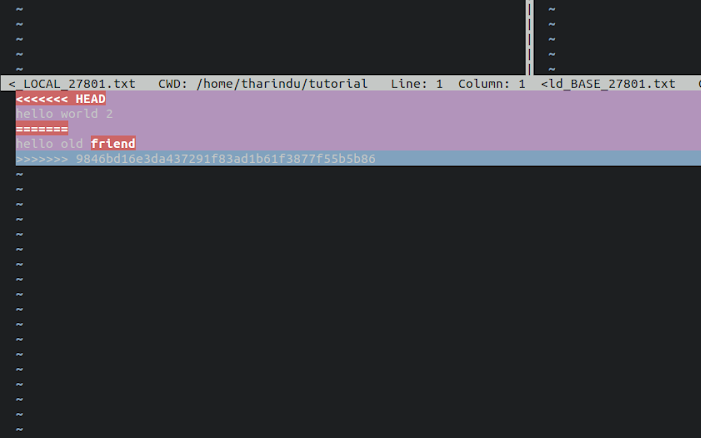
Or if you happen to be using some kind of an IDE or a good editor it'll show you the places where the conflicts took place. To resolve them you just need to remove the special markers that git places between the conflict areas and also decide on which code to keep in that commit.
Git Log
If you need to see the history of the commits of the repository you can use
git log
To list the commits and their message that was set.
Git Remote
To use git effectively you need to have a remote location that can store your project so that multiple people can access it. There are several sites that provide these services like, GitHub and GitLab. So to use them you'll need to create an account in one of those sites and create a remote repository for your local repository.
After you have created your remote repository you'll get a link to the repo which has a .git ending, for instance https://github.com/torvalds/linux.git, you can use that to set the remote in your local repo.
git remote add origin [remote-link]
Git Push
To push your code to the remote you can use
git push origin main
origin is the remote name that you set when you added the remote to your local repository.
main is the remote Branch name.
If you want to be able to push the code by just git push you'll have to permanently set the remote and branch by
git push -u origin main
On the first push or
git branch -u origin main
Git Pull
To pull changes from the remote you can use
git pull origin main
Or
git pull
If you had already set the default remote branch.
The pull may also create merge conflict that my need you to address.
Conclusion
Those commands that I have explained are the most used when using git, but they are not the only commands in git. There are many commands that are in the git documentation you can go and look through them more comfortably now that you have a gist of what git does.


